Guides › More ways to make skins
How to make a Minecraft cape, elytra or moving GIF cape (Cape Editor)
The Cape Editor page: paint a cape or elytra on the flat picture or straight on a 3D player, turn any GIF into a moving cape, and download it for Java (PNG / GIF + the free mod) or Bedrock (add-on or skin pack).
5 min read · 7 steps · Beginner
Step 1: Open the Cape Editor
Open Tools → Cape Editor (or go to mc-engine.app/cape-editor). From the skin editor: Cape → Open cape editor; on a phone: Studio → Cape & extras → Edit cape. In the Capes & Elytra library, Edit on any cape opens it here.
Your cape is saved in this browser by itself. The player wearing it is the skin you have open in the skin editor.
Step 2: Pick a view
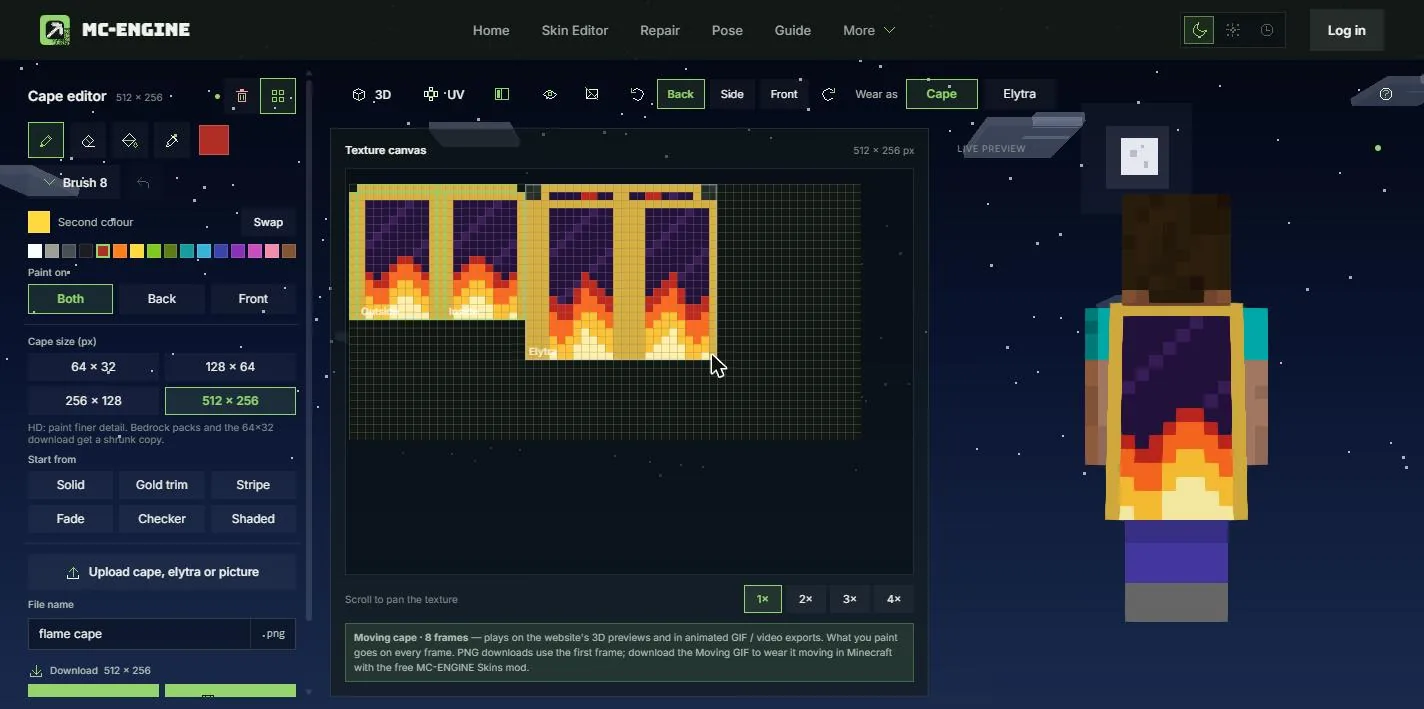
The top bar switches between 3D (only the player), UV (only the flat cape picture) and the split button (both side by side). You can paint on either: on the 3D player the left mouse paints, the right mouse turns and the wheel zooms.
The eye button changes the body: shown, see-through (to paint the inside of the cape from the front) or hidden (only the cape). The picture button turns the dark background on or off — off shows the sky. Back / Side / Front and the arrows turn the player, and Wear as: Cape / Elytra shows the same picture as a cape or as elytra wings.
Step 3: Paint it
Pencil (B), Eraser (E), Fill (stays inside one part of the cape) and Pick a colour. Brush sets how many pixels you paint at once, the grid button shows every pixel, Undo is Ctrl + Z and Redo is Ctrl + Y.
When you pick the eraser it asks what to erase: My drawing takes away only what you painted and brings the uploaded picture or template back; Everything makes the pixels see-through.
Paint on: Both copies what you paint on the back of the cape to the front (flipped), and the other way round; Back and Front paint only where you paint. Both elytra wings share one picture in Minecraft, so painting one wing shows on the other too.
The colour box opens a colour picker; every colour you pick is kept in the colour row. Second colour and Swap are used by Start from, which gives a ready cape in your colours: Solid, Gold trim, Stripe, Fade, Checker or Shaded.
Tip: The ? button at the right end of the top bar lists every tool and links the in-game guides.
Step 4: Turn a GIF or picture into a cape
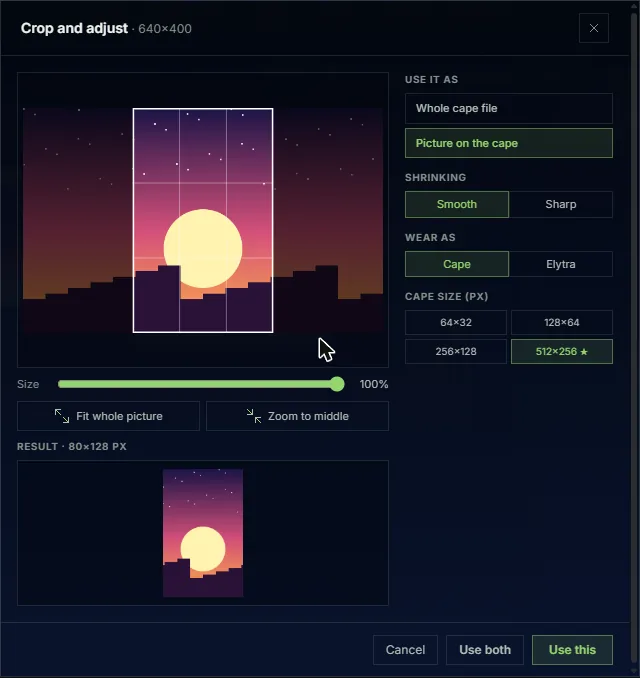
Upload cape, elytra or picture takes a PNG, JPG or WebP (up to 2 MB) or a GIF (up to 20 MB). In Crop and adjust, drag the box over the part you want — Fit whole picture and Zoom to middle help.
Then choose: Use it as (a whole cape / elytra file, or a picture on the cape or wings), Shrinking (Smooth for photos, Sharp for pixel art), Wear as (Cape or Elytra) and Cape size — ★ marks the most detail your crop has. A GIF keeps moving when Keep it moving is ticked.
Use this fills the side you picked; Use both puts the picture on the cape and the elytra. With Paint on: Back or Front, the picture goes only on that face.
Step 5: Size and downloads
Cape size: 64×32 is the normal Minecraft size; 128×64, 256×128 and 512×256 are HD for finer detail. Switch any time — going smaller and back up brings the detail back.
Every download uses the size you picked: PNG (the cape and elytra picture) and, for a moving cape, GIF. Bedrock add-on makes one .mcaddon with your moving cape and a moving elytra. File name names all of them.
Java: wear the PNG or GIF with the free MC-ENGINE Skins mod (guide Moving GIF cape in Minecraft). Bedrock: open the .mcaddon (guide Moving cape and elytra in Minecraft Bedrock).
Step 6: Several capes in one Bedrock file
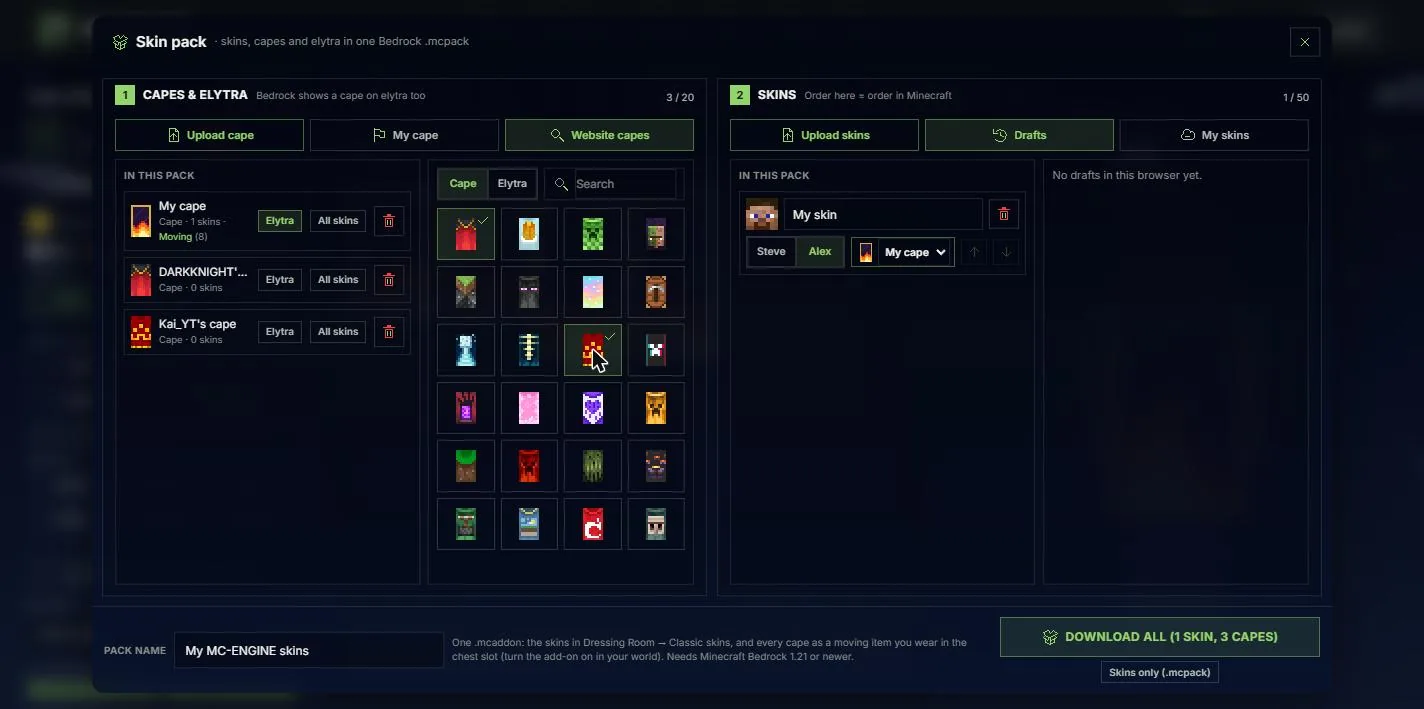
Skin pack opens a window with two halves: Capes & elytra (upload capes, add My cape or pick Website capes — up to 20) and Skins (upload, Drafts or My skins — up to 50). Give each skin a cape, pick which cape paints the Elytra (without a pick, only an elytra design does; press Elytra again to keep normal elytra), and name the pack.
Download all makes one .mcaddon: the skins in Dressing Room → Classic skins, and every cape as a moving item you wear. Skins only (.mcpack) keeps just the skins, with still capes. Guide: How to make a Bedrock skin pack.
Step 7: On a phone
The phone layout works like the phone skin editor: one view at a time (3D or UV in the bottom bar), the tools in a card at the bottom, and Upload and Save right above it.
Tap Brush, Both, Templates, Colour, Cape / Elytra or the size button and their choices pop up above the tools; tap anywhere else to close them. One finger paints on the 3D player and two fingers turn it.

More guides
- Image to Minecraft skin: upload any picture or skin PNG
- How to fix a Minecraft skin: broken, old, or not showing in the game
- How to make a Minecraft skin from a photo or image
- Pose your Minecraft skin and make renders & videos
Updated 2026-11-12 · by the MC-ENGINE team
Not an official Minecraft product. Not approved by or associated with Mojang or Microsoft.